Introduction
Our goal in this series of three blogs is to make Google Login available with an Oracle Jet webapplication and with an Oracle Jet hybrid application.
Android Virtual Device - Oracle Jet Hybrid application
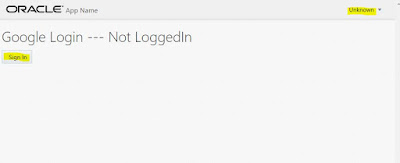
Chrome Browser - Oracle Jet WebApplication - Not Logged In - User Clicks Sign In
Chrome Browser - Oracle Jet WebApplication - Not Logged In - User has to give access rights to the webapplication
Chrome Browser - Oracle Jet WebApplication - User is logged in - Profile information (name, picture) available and user can sign out.
In this and the following two blogs we will talk about the following
- This blog (Google Login Part 1 blog): Create Google Project and OAuth2 ClientID
- Google Login Part 2 blog: Make Google Login with Oracle Jet Webapplication work
- Google Login Part 3 blog: Make Google Login with Oracle Jet hybrid appliation work
Create Project
If we want to use the Google Login mechanism, we have to create our own project on the Google cloud console.
1. Enter the following URL and click on Create Project
Choose whatever name you want for the project
Enable Google+ API
If we want to use the Google Login mechanism, we have to use the functions of the Google+ API. That's why we have to enable it next.
Click on enable and Mange API
3. Now click on Library (left navigation bar) and after that click on Google+ API
4. Click on Enable
Create OAuth2 ClientID
The client ID is needed to allow the communication between the Oracle Jet webapplication and the Google+ API.
5. Do the following steps
- Click on Credentials (left navigation bar)
- Click on Create Credentials
- Select OAuthClientID
6. Fill out the form with the following values
- Application Type: web application
- Name: [WHATEVER_NAME_YOU_WANT]
- Authorised Javascript origins: Here you have to add all the webpages that should be allowed to use this clientId
- http://localhost
- http://localhost:8383 [Oracle Jet local server]
- http://[YOUR_PRODUCTIVE_DOMAIN]
- Click on Create
7. An OAuth 2.0 Client ID has been created and should be visible.
It has the format [LONG_UNIQUE_ID].apps.googleusercontent.com
ATTENTION: This
id will be needed in the future. I will reference to it as the GoogleLogin Web
ClientID
Other
8. As the last step you have to click on OAuth consent screen. Here you have to define the application name that will be visible to the enduser, when he has to give the rights to your app. (Checkout first picture in this blog as example - Android virtual device screenshot)
Enter as Product name whatever you want
Conclusion
Now after creating a Google project and an OAuth client id for our project we can move on to the next blog, which will tell us how to use this client id to make Google Login possible with Oracle Jet webapplication.


Keine Kommentare:
Kommentar veröffentlichen